Quickstart
Intro
This is a guide on how to start using the Underwater GPS system. The steps are:
- Power the topside unit
- Calibrate IMU
- Deploying receivers
- Connect everything
- Select locator and channel
- Configure receiver placement in GUI
Power the topside unit
Start by connecting power to the topside unit. We do this first because we want the GPS receiver to start receiving signals and acheive a lock while we setup the rest of the system. If you are using the Locator-S1, power it on now so it also have time to get GPS lock.
Calibrate IMU
Connect the Ethernet cable to the topside unit and your computer. Then open your web browser and type in the IP-address of your topside unit which is defined by the position of the dip-switch on the Master-D1. How to change the IP-address is described here. At the top bar on the GUI you will see a calibration bar for the IMU. To calibrate the IMU rotate it in a figure of 8 and keep doing it until the IMU calibration bar becomes full and green.
Deploying of receivers
Before starting to deploy the receivers in the water, add a piece of tape on the receiver cable on the desired depth to make setup easier. Place the receivers in the water on the desired location and decide which number (1-4) each receiver will have. This is important when connecting the receivers to the topside unit.
Tip
Adding lead weights just above the receiver helps keep them stable when doing the positioning.
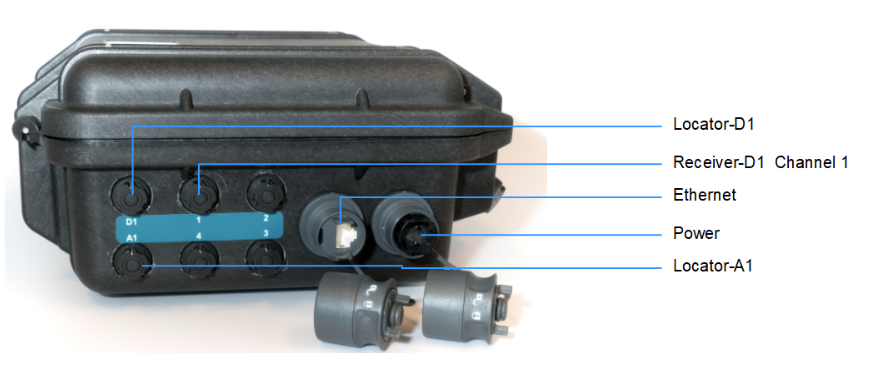
Connect everything
When connecting the receiver cables to the topside unit remember the numbering you decided on and connect the connector to the accordingly port. If this is not correct the position will be completely wrong. Next you connect the Locator if you are using the A1 or D1.
Select locator and channel
Now that everything is connected and ready it is time to select the right locator and choose which channal to listen on. This is configurated on the setting page of the web GUI. The Water Linked standard is to use channel 17 and this is also the default channel for the Locator-S1.
Configure receiver placement and seach range in GUI
After selecting the correct locator, you need to provide the correct placement of the receivers to the GUI for the positioning to work correctly. This is done by drag'n drop of each receiver to the correct placment relative to the topside unit. The position of each receiver is seen below in the map view. It you click on the receiver you get a pop up with the possibility to write its exact placment. Once this is done you can limit the search range by using the same drag and drop feature.
Warning
If you are using the Locator-A1 or S1, you need to provide depth information to the topside unit. Description on how to do this is found here.
Tip
Reducing the search range helps to improve the performance of the system. It is recomended to limith this range if you are operating in a smaller area. This is especially important in tanks.
You are now ready to explore the underwater world and knowing where you are at the same time.